
How to Mount in Wall Speakers: Easy Installation Guide
To mount in-wall speakers, measure the correct location, cut a hole, secure the speaker, and connect the wiring. In-wall speakers offer a sleek and space-saving audio solution for any room.
Designed to be installed directly into the wall, these speakers provide immersive sound without taking up valuable floor space. With the right tools and know-how, mounting in-wall speakers can be a straightforward DIY project. Whether you’re creating a home theater system or looking to enhance the audio in your living space, in-wall speakers can provide a seamless and professional-looking audio solution.
This guide will cover the essential steps and considerations for mounting in-wall speakers, so you can enjoy high-quality sound without cluttering your space.
Selecting The Right Wall Location
Assessing The Room Layout And Speaker Placement
Before mounting in-wall speakers, it is crucial to assess the room’s layout and the ideal placement for the speakers. Begin by considering the seating area and the optimal locations for clear, balanced sound distribution. It’s essential to achieve an immersive sound experience by strategically positioning the speakers.

Identifying Potential Obstacles Or Obstructions
Prior to the installation, thoroughly inspect the chosen wall location for any potential obstructions or obstacles that could impede the sound quality. Common obstructions may include electrical wiring, plumbing, or wall studs. Identifying and addressing such obstacles is essential to ensure the speakers can be installed seamlessly without compromising the overall sound performance.
Preparing The Wall For Installation
When mounting in-wall speakers, proper preparation of the wall is crucial for a seamless installation. This stage involves gathering necessary tools and materials, as well as measuring and marking the speaker cutout area. By focusing on this aspect, you ensure that the speakers will be securely and aesthetically installed, delivering optimal sound quality.
Gathering Necessary Tools And Materials
Before beginning the installation, gather the following items:
- Stud finder
- Measuring tape
- Pencil or marker
- Drywall saw
- Screwdriver
- Ladder or step stool
- In-wall speaker mounting bracket or template (if provided)
- Protective eyewear and gloves
Measuring And Marking The Speaker Cutout Area
Measure the area where the speakers will be installed, ensuring there are no obstructions or wiring behind the chosen location. Use the stud finder to locate and mark the position of the studs. Next, use the mounting bracket or template to outline the cutout area on the wall, taking precise measurements for a snug fit.
“`
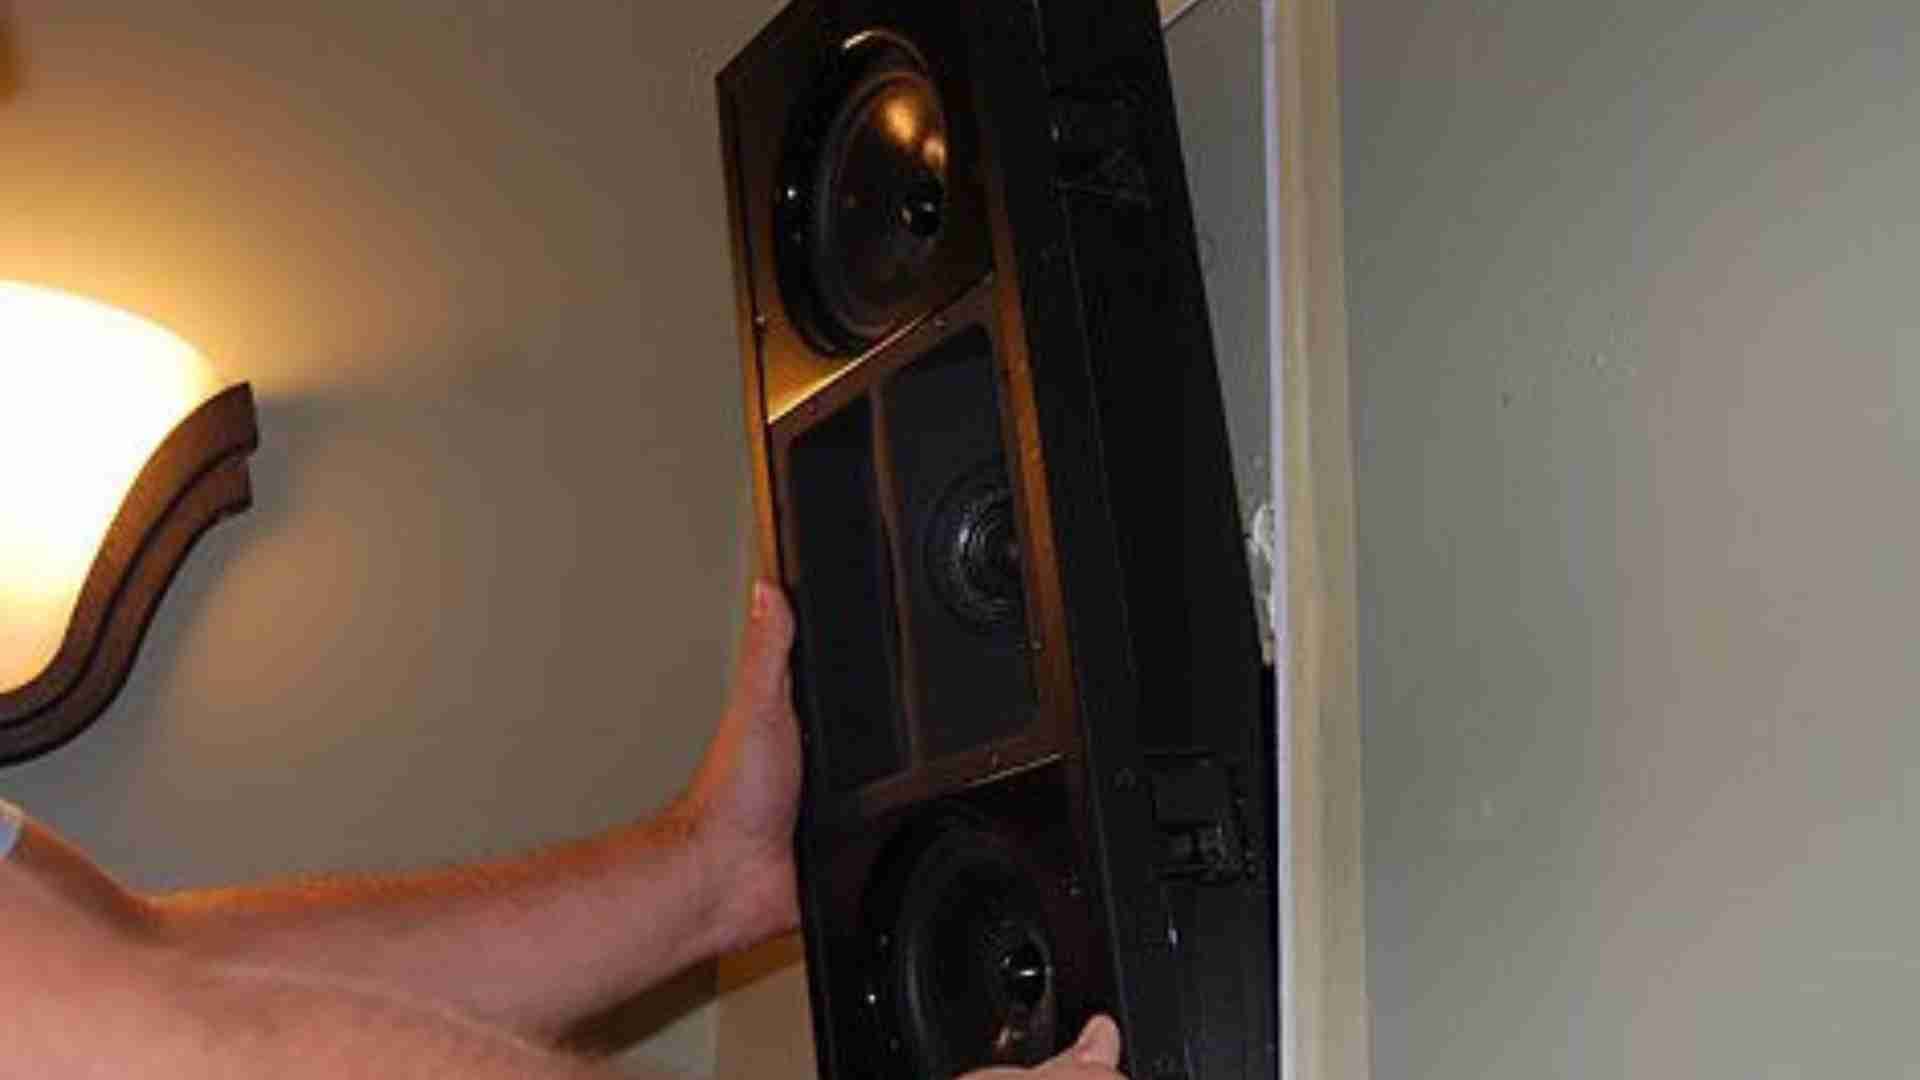
Installing The In-wall Speaker
When it comes to a clean and elegant home entertainment setup, in-wall speakers are a popular choice. Installing in-wall speakers can provide a seamless audio experience without the clutter of traditional speakers. Proper installation of in-wall speakers ensures optimal sound quality and aesthetics. In this guide, we will walk you through the steps to install in-wall speakers, starting with cutting the speaker hole in the wall and then wiring and connecting the in-wall speaker.
Cutting The Speaker Hole In The Wall
Before you start cutting into your walls, it’s important to identify the ideal placement for your in-wall speakers. Consider the room acoustics and the manufacturer’s guidelines for speaker placement. Once you’ve determined the location, use a stud finder to locate and mark the studs in the wall. Then, use a template provided by the speaker manufacturer to outline the cutout area.
Ensure the power source is turned off and use a drywall saw to carefully cut along the marked lines. Take precautions to avoid damaging any electrical wiring or plumbing within the wall. Once the hole is cut, make sure it fits the speaker perfectly and is securely anchored to the studs before proceeding with the installation.
Wiring And Connecting The In-wall Speaker Properly
Wiring in-wall speakers should be done in compliance with local building codes and regulations. Start by running the speaker wires from the audio source to the speaker location. Use CL2-rated speaker wire designed for in-wall use to ensure safety and performance.
Strip the insulation from the speaker wires and connect them to the terminals on the back of the in-wall speaker. Ensure a secure connection, observing the polarity markings. Once the connections are made, carefully tuck the excess wire behind the speaker and mount it into the wall opening.
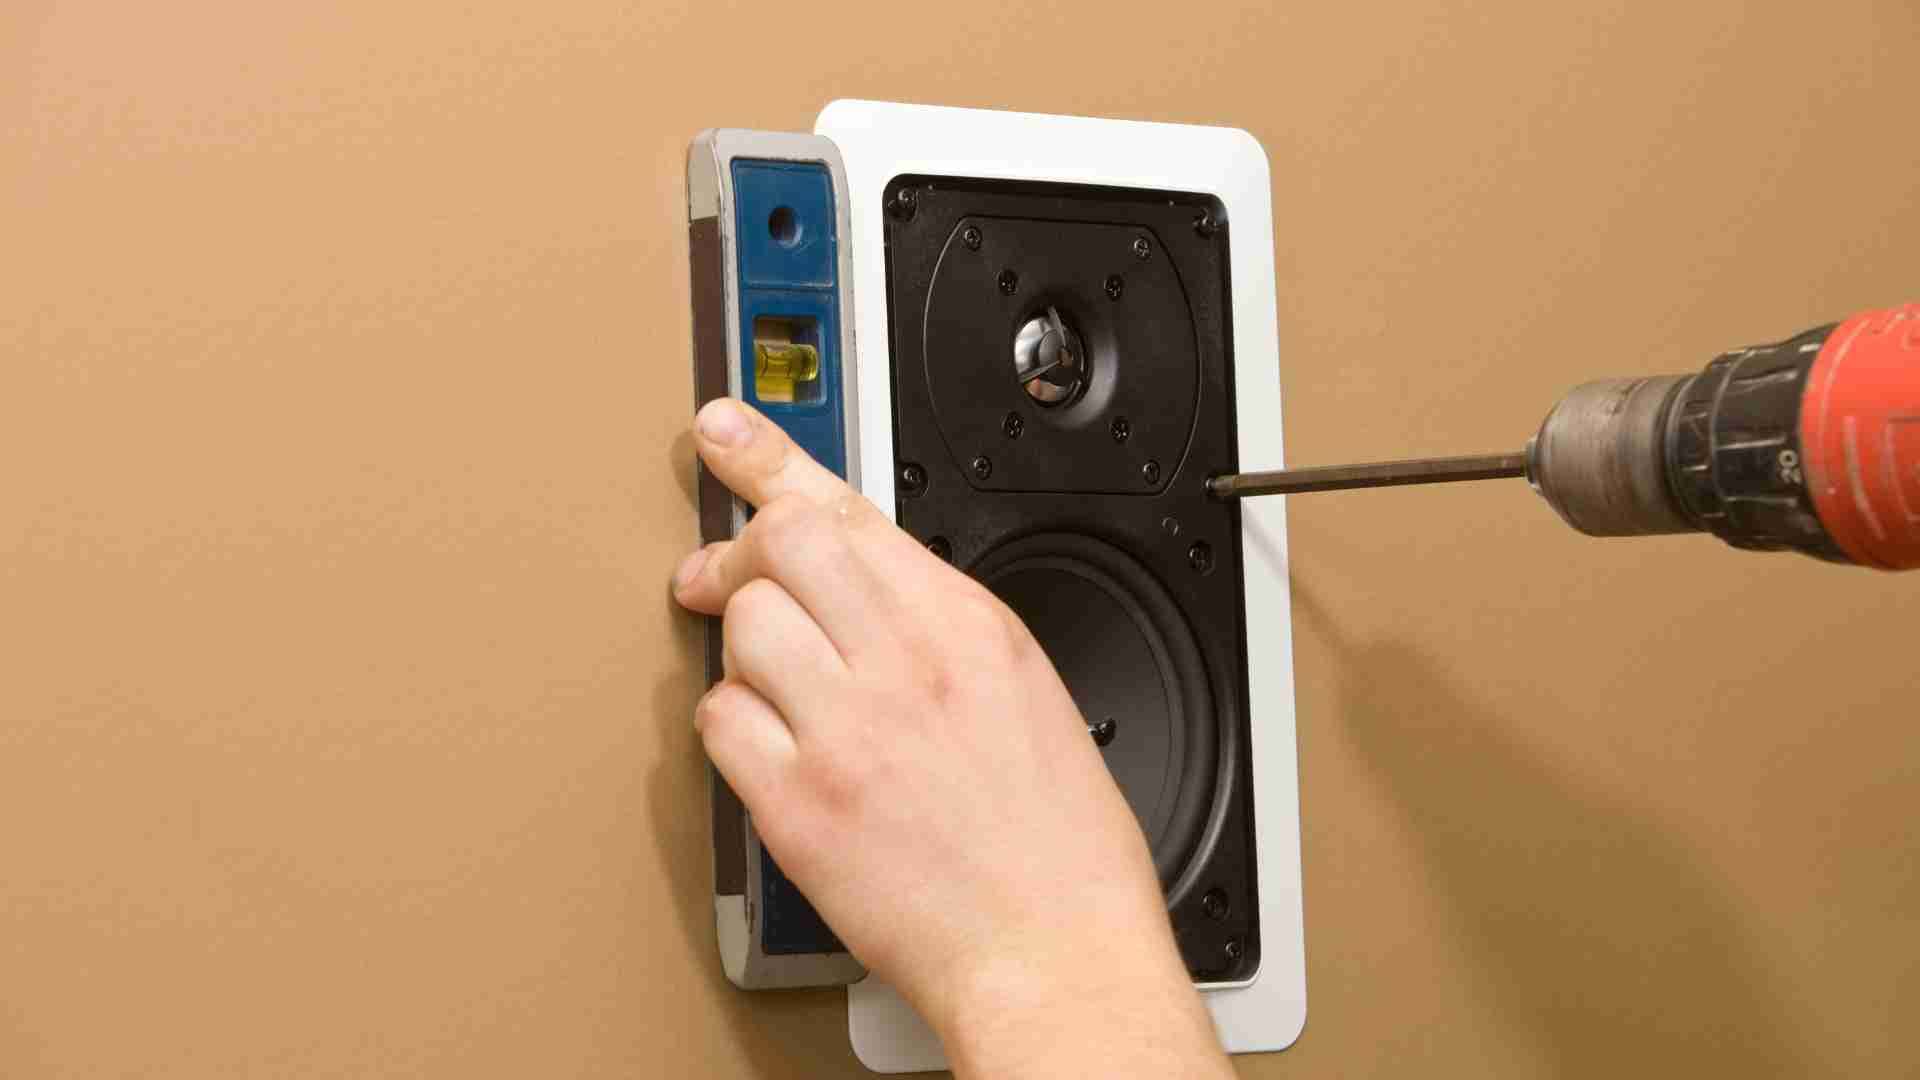
Securing And Testing The Installation
When it comes to wall-mounted speakers, ensuring a secure installation and testing for optimum sound quality are critical steps for a successful setup. Securing and Testing the Installation not only ensures the safety and stability of the speakers but also guarantees a remarkable auditory experience.
Mounting The Speaker Securely In The Wall
Before mounting the speaker, ensure that the wall is suitable for supporting the weight and dimensions of the speaker. Use a stud finder to locate the studs within the wall and mark their positions. Carefully cut a hole for the speaker using a wall saw, following the manufacturer’s instructions. Secure the speaker bracket or mount within the wall using screws and anchors, ensuring that it is flush and level with the wall surface. Confirm that the speaker is firmly set in place to prevent any potential risks of instability or detachment.
Testing The Functionality And Sound Quality
- Connect the speaker wires to the respective terminals on the speaker and ensure a secure connection.
- Activate the audio system and play various types of music to test the functionality. Confirm that the sound is well-distributed and free from any distortions or anomalies.
- Adjust the positioning of the speaker if necessary and re-test the sound quality until the optimal location is achieved.
- Calibrate the speaker settings as required and confirm that the sound reproduction meets the desired standard.
Troubleshooting And Tips
Mounting in-wall speakers can elevate the audio experience in your home, but it’s important to address common installation challenges and optimize performance to get the best results. Here are some troubleshooting tips and tricks to help you make the most of your in-wall speakers:
Addressing Common Installation Challenges
During the installation process, it’s common to encounter various challenges that can affect the performance of in-wall speakers. Here are some common issues and tips to address them:
- Wall Material Compatibility: Ensure that the wall material is suitable for mounting speakers. Use proper tools to cut the wall and avoid damaging it during installation.
- Stud Placement: Locate the studs in the wall to securely mount the speakers. An electronic stud finder can be helpful in this process.
- Wiring and Cable Management: Plan the wiring and cable management carefully to avoid interference, tangles, and damage to the cables during installation.
- Leveling and Alignment: Use a level to ensure that the speakers are aligned and mounted evenly for optimal sound distribution.
Optimizing The In-wall Speaker Performance
To maximize the performance of in-wall speakers, consider the following tips to optimize their sound quality and ensure a seamless integration with your home audio system:
- Speaker Placement: Position the speakers at the proper height and distance for an immersive audio experience. Consider the room acoustics and seating arrangement for optimal placement.
- Amplifier and Receiver Settings: Adjust the amplifier and receiver settings to match the specifications of the in-wall speakers for balanced sound output.
- Acoustic Treatment: Use acoustic panels and other sound-absorbing materials to enhance the sound quality and reduce reflections in the room.
- Sealing and Insulation: Ensure that the speakers are properly sealed and insulated in the wall to minimize sound leakage and improve overall performance.
Frequently Asked Questions On How To Mount In Wall Speakers
What Are The Benefits Of Mounting In-wall Speakers?
Mounting in-wall speakers saves space, enhances aesthetics, and provides a seamless audio experience without cluttering the room with bulky equipment.
How To Choose The Best Location For In-wall Speakers?
Select a location that minimizes obstructions, optimizes sound distribution, and complements the room’s layout and décor for the best audio performance.
What Tools Are Needed To Mount In-wall Speakers?
Essential tools include a stud finder, level, drywall saw, screwdriver, and wire stripper to ensure secure and accurate installation of in-wall speakers.
Can In-wall Speakers Be Installed In Any Type Of Wall?
In-wall speakers can be installed in drywall, plaster, or paneling with the appropriate tools and techniques, ensuring a secure and seamless integration into the wall.
Conclusion
To sum up, mounting in-wall speakers can enhance your home audio system seamlessly. With these simple steps, you can enjoy immersive sound without compromising your home’s aesthetics. From choosing the right location to concealing wires, you now have the knowledge to achieve a professional installation.
Elevate your listening experience with in-wall speakers today.


One Comment